¶ Overview
The following guide reviews a built-in feature in TeraTerm that allows for scripting configuration updates, which can be particularly useful for updating and provisioning Automated Monitoring Nodes during production assembly. This is not typically needed to be issued by an end-user, as our prebuilt nodes come configured turnkey; however, for our OEM partners, this can be a particularly useful tool.
¶ Setup
Connect an Automated Monitoring Node, and open TeraTerm, as explained in our other guide.
¶ Obtain a prompt from the node
During the bootup, press C after the node prints Press 'C' to stop booting and configure................................
rst:0xc (SW_CPU_RESET),boot:0x13 (SPI_FAST_FLASH_BOOT)
configsip: 0, SPIWP:0xee
clk_drv:0x00,q_drv:0x00,d_drv:0x00,cs0_drv:0x00,hd_drv:0x00,wp_drv:0x00
mode:DIO, clock div:2
load:0x3fff0030,len:1184
load:0x40078000,len:13232
load:0x40080400,len:3028
entry 0x400805e4


--------------------------------------

        Automated Monitoring Node
        by neatMon, Inc.

--------------------------------------

Device Info:
        GUID:           6fb178bc-bf35-edc1-d48afcae1234
        P/N:            PLUS
        HW:             1.06
        FW:             3.17

Network Settings:
        Server:         api.neatmon.io
        Path:           /api/device/6fb178bc-bf35-edc1-d48afcae1234
        Port:           1330
        SSID:           YOUR_SSID
        Password:       YOUR_PASSWORD
        Sync rate:      15m
        Alert sync rate:15m

General Settings:
        Battery monitor:enabled
        Demo mode:      false
        Num sensors:    0
        Sleep mode:     3
        Power mode:     0

Sensor Definitions/Settings: no sensors configured

Press 'C' to stop booting and configure................................

neatMon Main Menu
        1: Network Config
        2: Sensor Config
        3: Utilities
        x: < Save Config & Quit
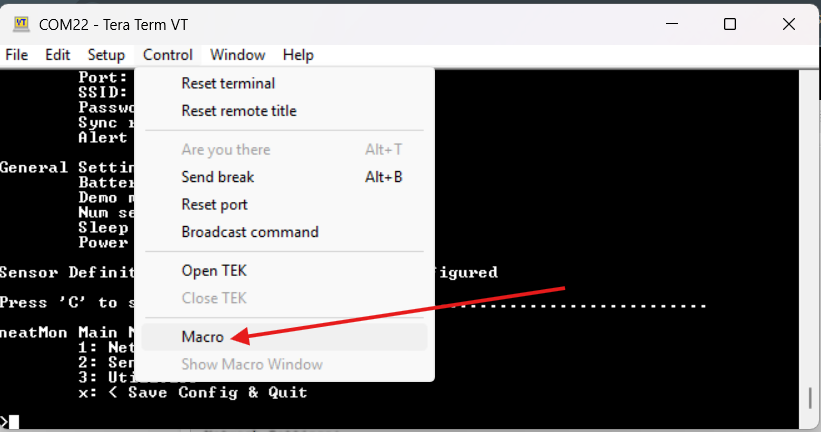
>¶ Running a script
Make sure to start with the prompt from a node, it should be as shown above, as indicated with a symbol like this: >
Open the Control menu, and select Macro in TeraTerm, then navigate to your saved .ttl macro file and choose open
¶ Creating a script
¶ Specifications for functions and other variables
See the guide from TeraTerm for specifications about in-built functions, etc
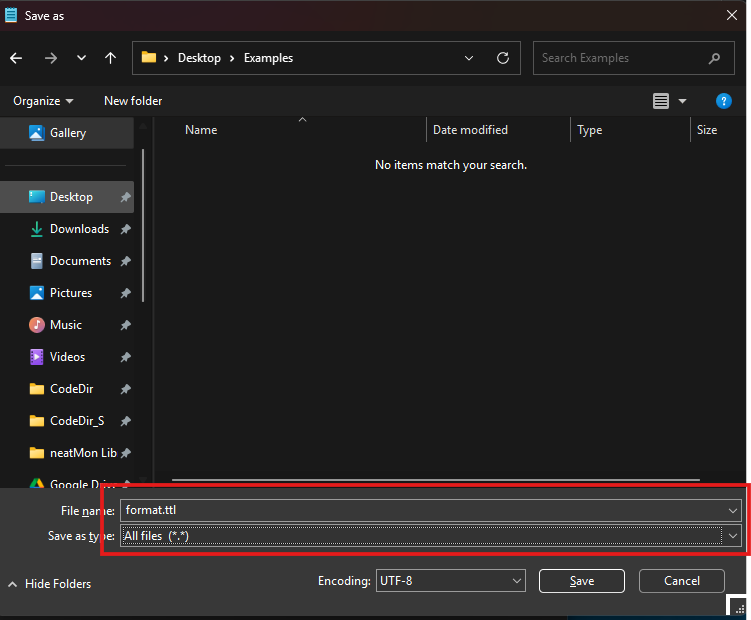
¶ File specifications
Use Notepad to create files
Save as .ttl format as shown below
¶ Examples
¶ Format Drive
The following is a simple script that starts with going to the Utility menu, then formats the system drive
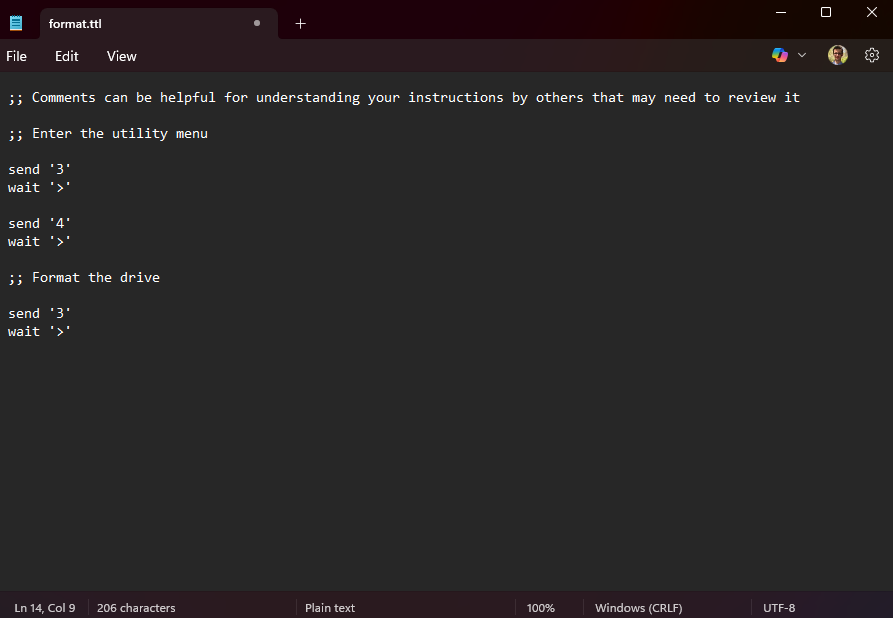
;; Comments can be helpful for understanding your instructions by others that may need to review it

;; Enter the utility menu

send '3'
wait '>'

send '4'
wait '>'

;; Format the drive, and reset to defaults

send '3'
wait '>'
¶ Adding Sensor
The following script will require an ENTER key press periodically to accept the configuration or edit.
;; NOTE:
;;	Some commands will require a return key to be pressed to confirm responses.
;;

;; Enter the sensor menu
send '2'
wait '>'

send '1'
wait '>'

;; Add an analog sensor
;;  NOTE:
;;	Each sensor menu may be slightly different and must be tested first
;;	 to determine the sequence of commands and responses.
;;

send '3'
wait '> '

;; Sample Rate
send '15'
wait '>'

;; GPIO Port #
send '1'
wait '>'

;; Generic Analog Sensor
send '1'
wait '>'

;; Scaling option NONE
send 'n'
wait '>'

;; Name option NONE
send 'n'
wait '>'

;; Excitation time
send '100'
wait '>'

send 'Y'
wait '>'

;; Read time
send '100'
wait '>'

send 'Y'
wait '>'

;; Reboot to save

send 'x'
wait '>'

send 'x'
wait '>'