 |
LeafMon-S |
¶ Overview
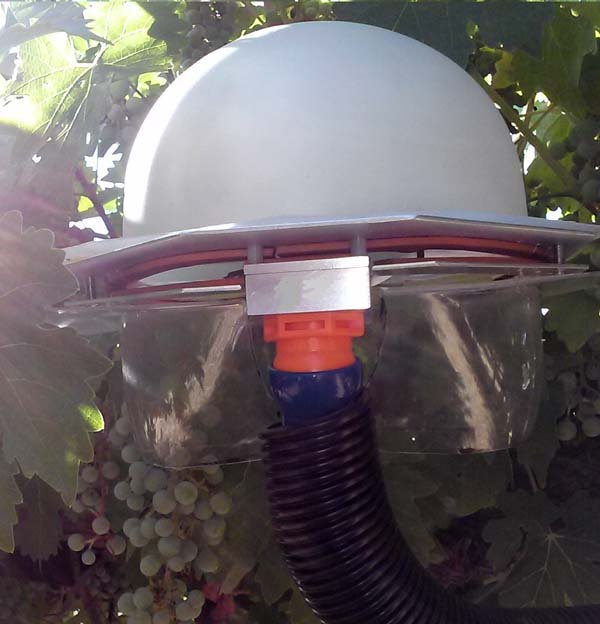
The Cermetek LeafMon integrates with the neatMon Automated Monitoring Nodes via the SDI-12 interface and is +12V powered. From the manufacturer:
Sensors:
While LeafMon reports the Crop Water Stress Index, it includes multiple sensors. Five environmental sensors are embedded inside the LeafMon. These sensors measure ambient temperature, wind speed, photosynthetically active radiation, relative humidity, and leaf surface temperature. These sensor values are combined within the RSVP server code to calculate the Crop Water Stress Index.
- Ambient Temperature ±0.5° Celsius
- Wind Speed ±1.5 Meters/second
- Relative Humidity ±3%
- Photosynthetically Active Radiation 400 to 700 nanometers
- Leaf Surface Temperature ±0.5° Celsius
Using LeafMon for Strategic Deficit Irrigation:
Growers employ strategic deficit irrigation for many crops to improve quality, improve yields, and fight disease. The traditional way to measure water stress in a plant is with a pressure chamber. The pressure chamber measures Stem Water Potential in a leaf removed from the tree, vine, or plant. Monitoring plant water stress for deficit irrigation with the pressure chamber requires daily trips to the field for a single data point. The validity of that pressure chamber data depends upon the consistent focus and skill of the operator. Because LeafMon reports water stress continuously and does not depend on an operator in the field, it allows for the more precise management of deficit irrigation. The grower irrigates his crop, checks the Crop Water Stress Index daily, and irrigates again when the Crop Water Stress Index approaches the maximum acceptable level for that tree, plant, or vine. Whether the goal is reducing canopy growth in vineyards or avoiding hull rot in almond orchards, LeafMon contributes to effective strategic deficit irrigation.
- Enables Fully Automated Crop Stress Management Resulting in Higher Crop Quality or Yield
- Allows Non-destructive Plant Monitoring
- Presents Instantaneous Results to the Grower Through any Internet Enabled Smartphone, Tablet, or Notebook
- Results Independent of Operator Skill
- Lowers Labor Costs when Compared with Pressure Chamber Readings
¶ Getting Started
¶ Installation
The LeafMon connects to any GPIO port on the neatMon Automated Monitoring Nodes. Only one LeafMon may be plugged into the GPIO port. No other sensors can be connected to the same GPIO port. If other sensors are needed, use any other GPIO or ports available.
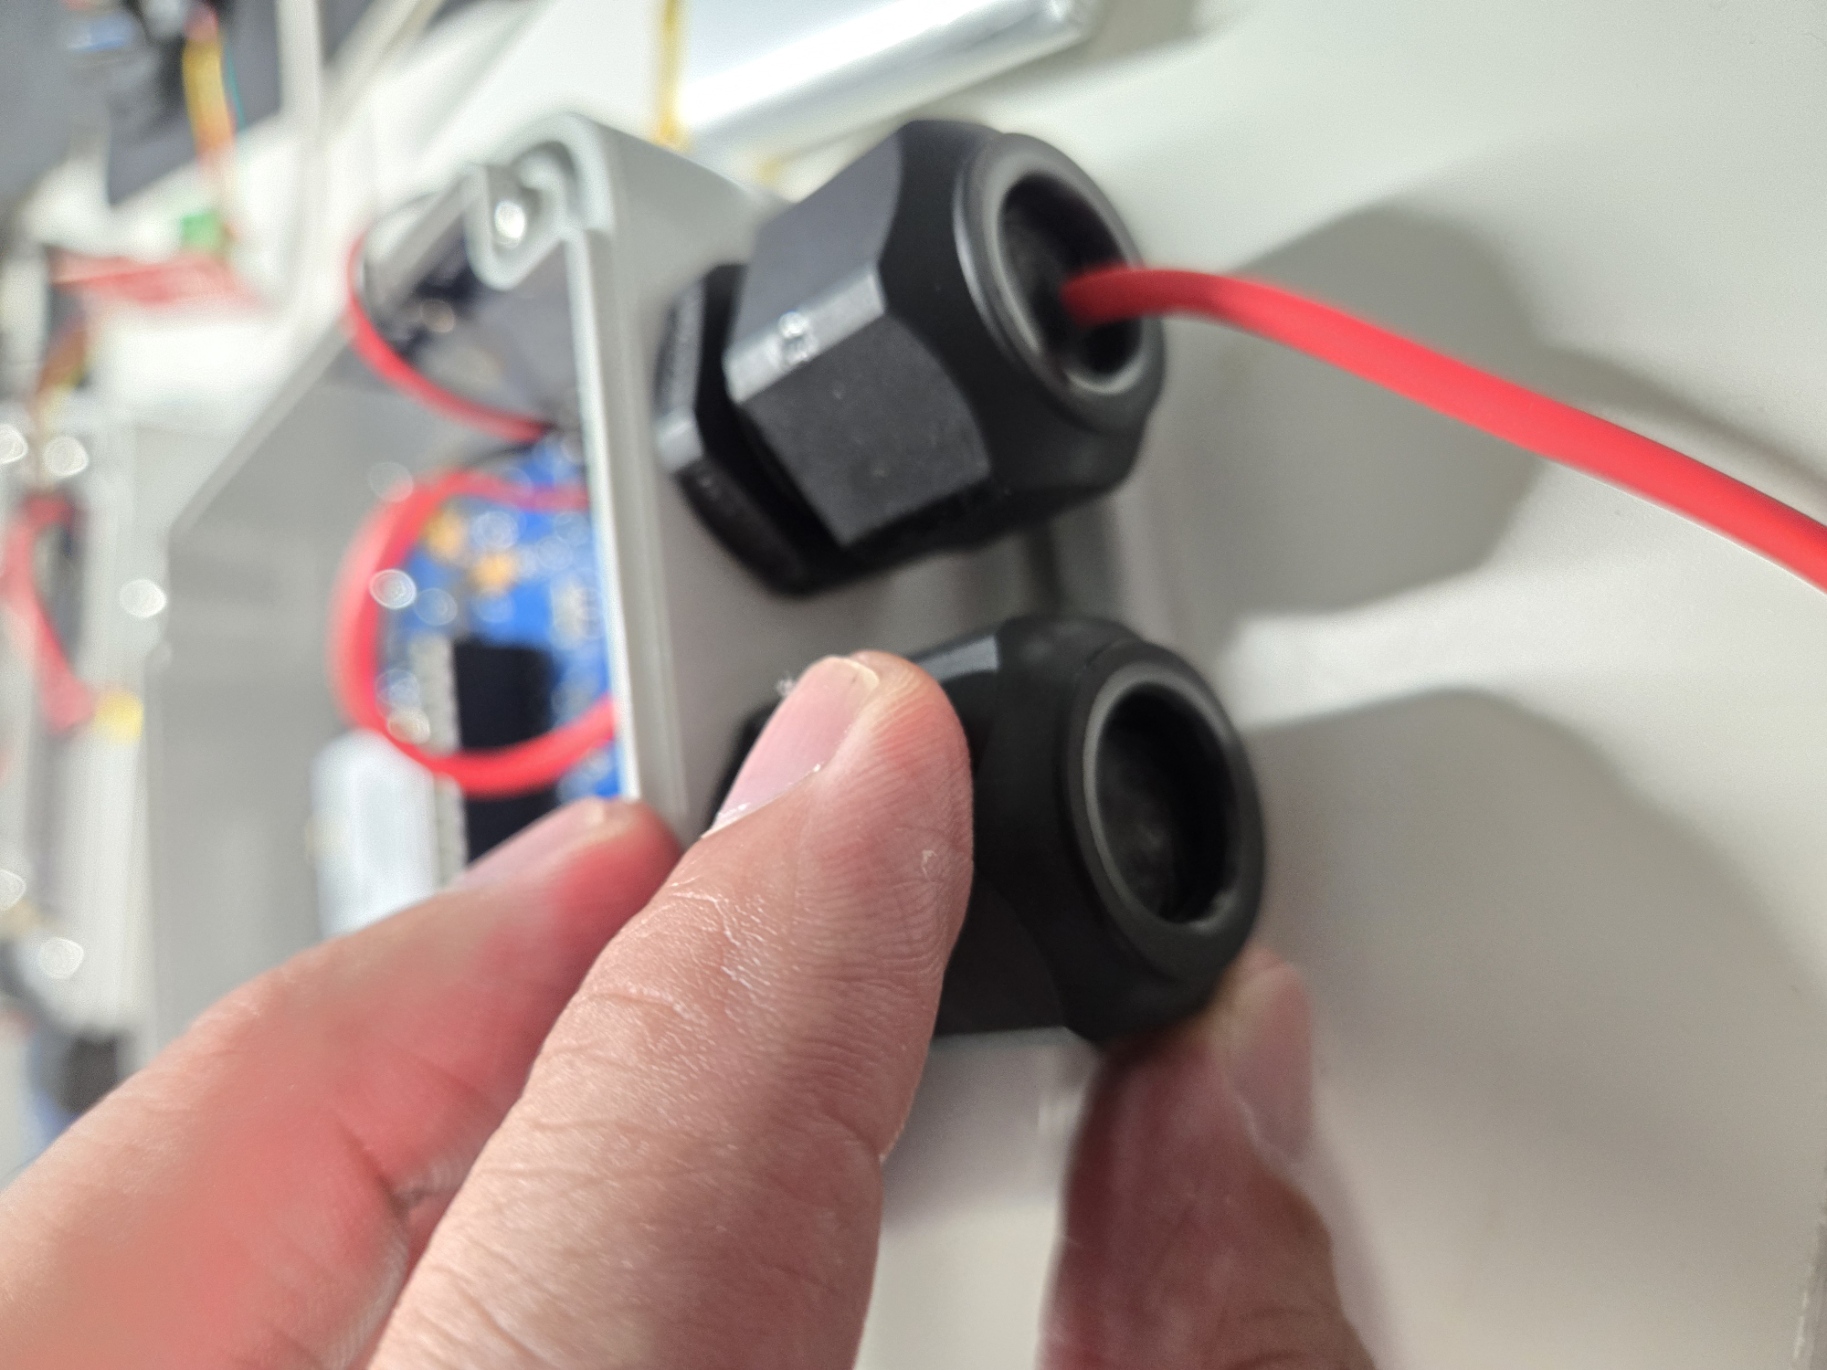 |
Loosen the liquid tight strain relief |
 |
Perforate the rubber seal with a small screwdriver, being careful not to damage any electronics inside the enclosure |
 |
Insert the cable and pull through the perforation in the liquid tight |
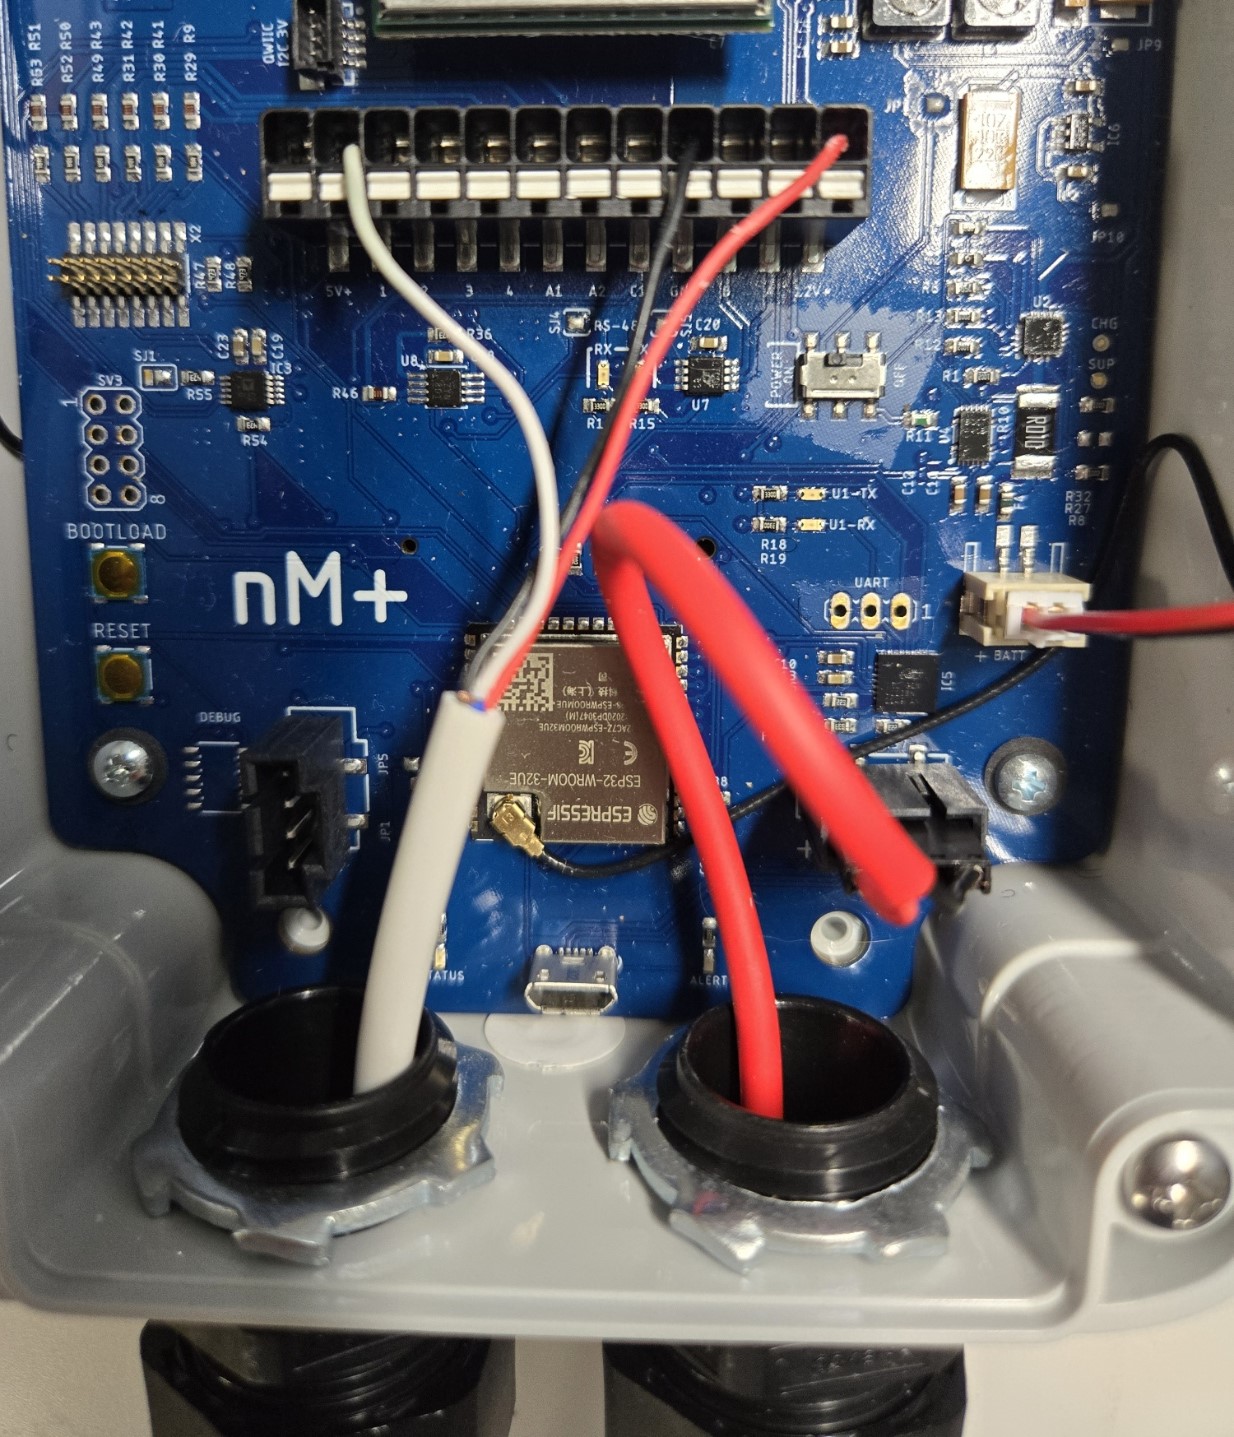 |
Connect LeafMon to the GPIO port (in this case showing GPIO 1), Ground, and +12V |
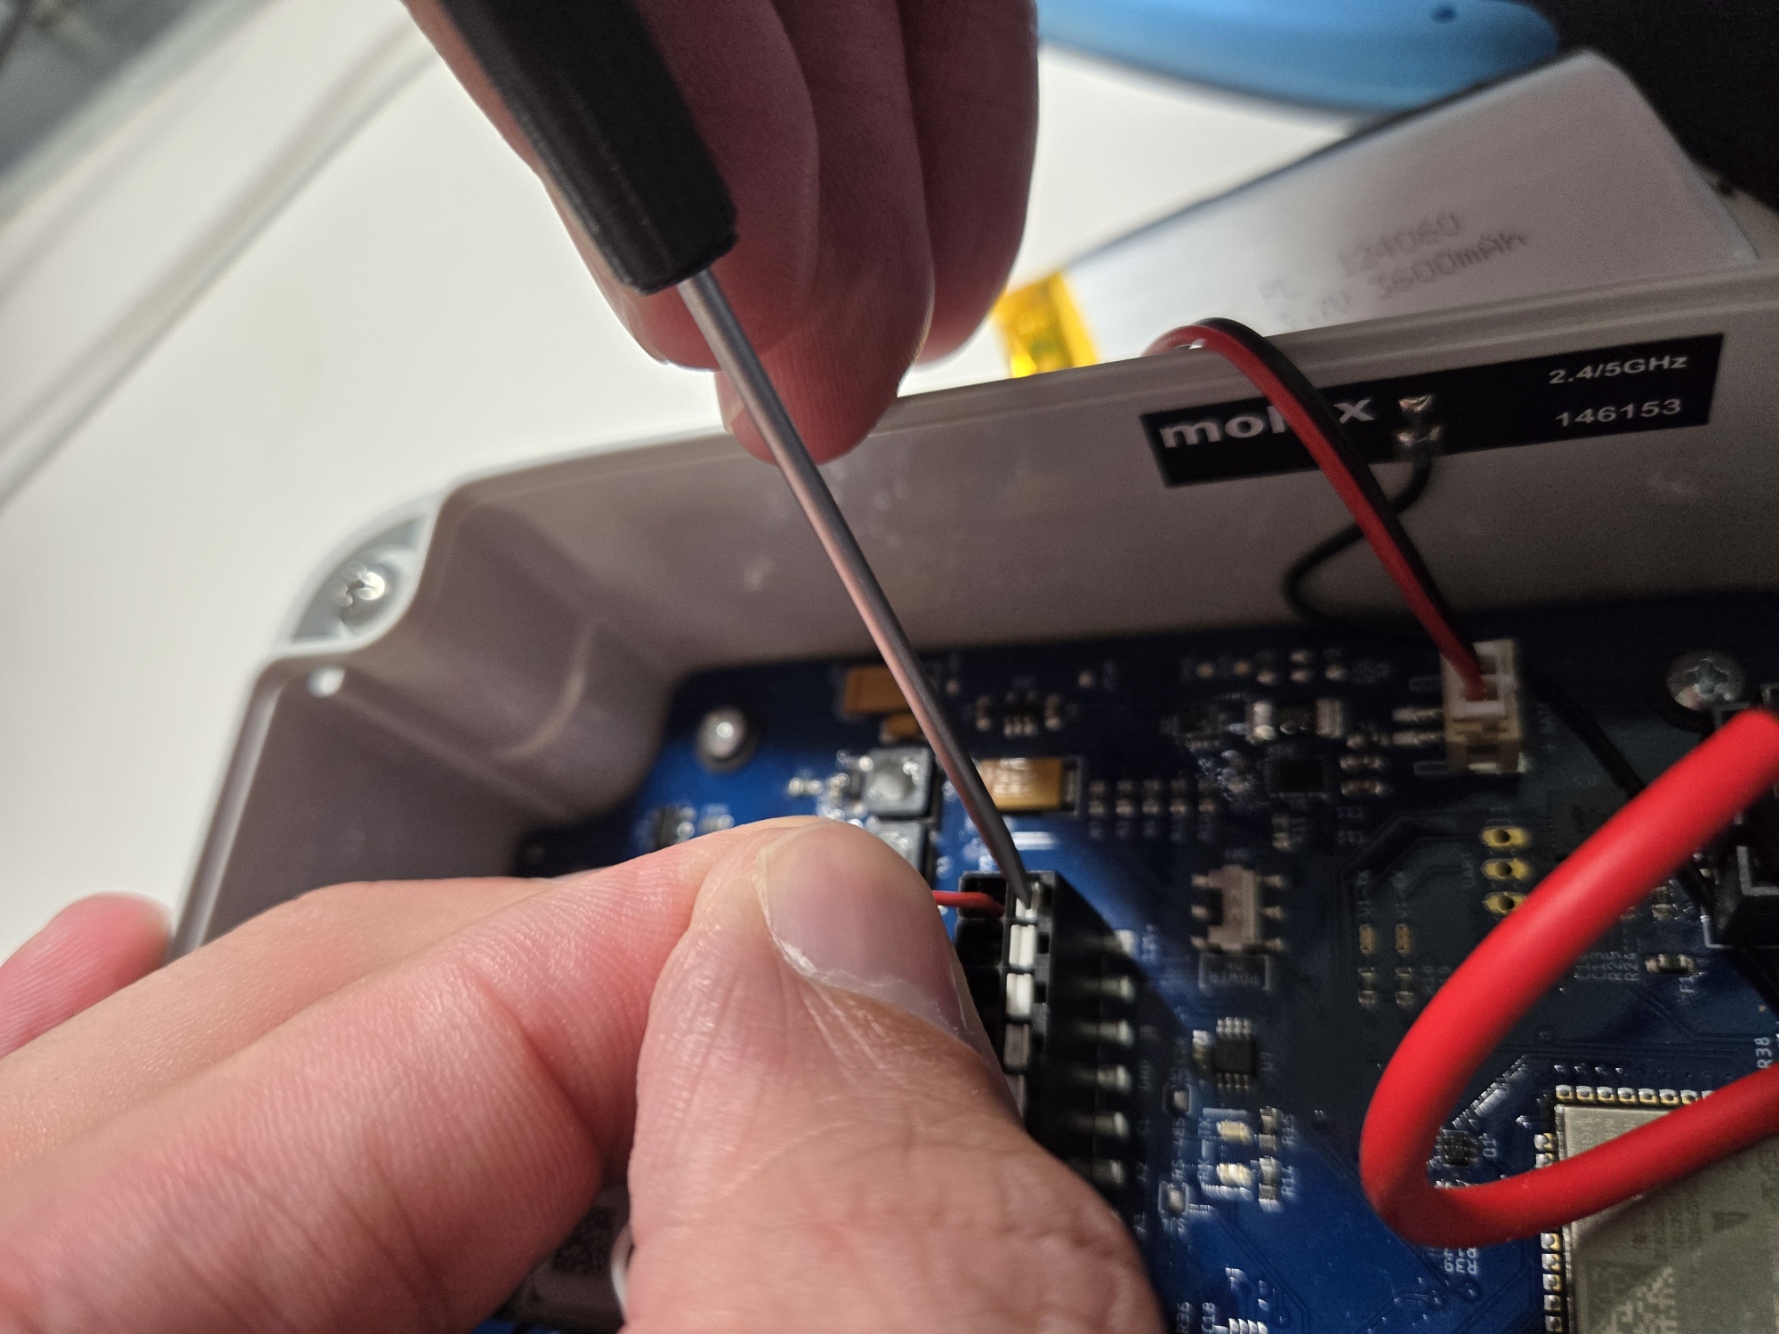 |
Use a screwdriver to loosen the terminal block by gently pressing down and push the wire until fully seated. Make sure no wire is exposed outside the terminal block. We recommend using ferrule crimps to ensure good connection to wire and firm insertion in the terminal blocks |
When wiring is completed and all sensors have been connected properly, be sure to tighten the liquid tight to provide strain relief to the terminal blocks.
¶ Configuration
NOTE: Before beginning any sampling or operation of the node, be sure to connect the battery and turn the power switch to the ON position
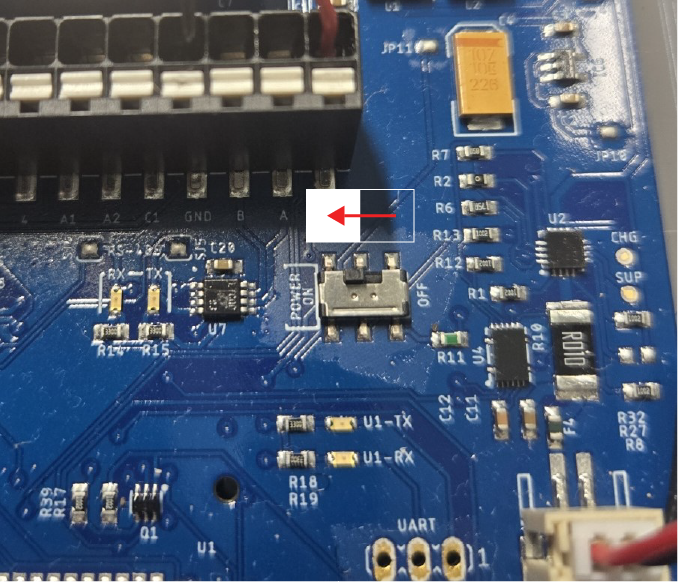 |
Push the switch toward the text that reads “POWER ON” |
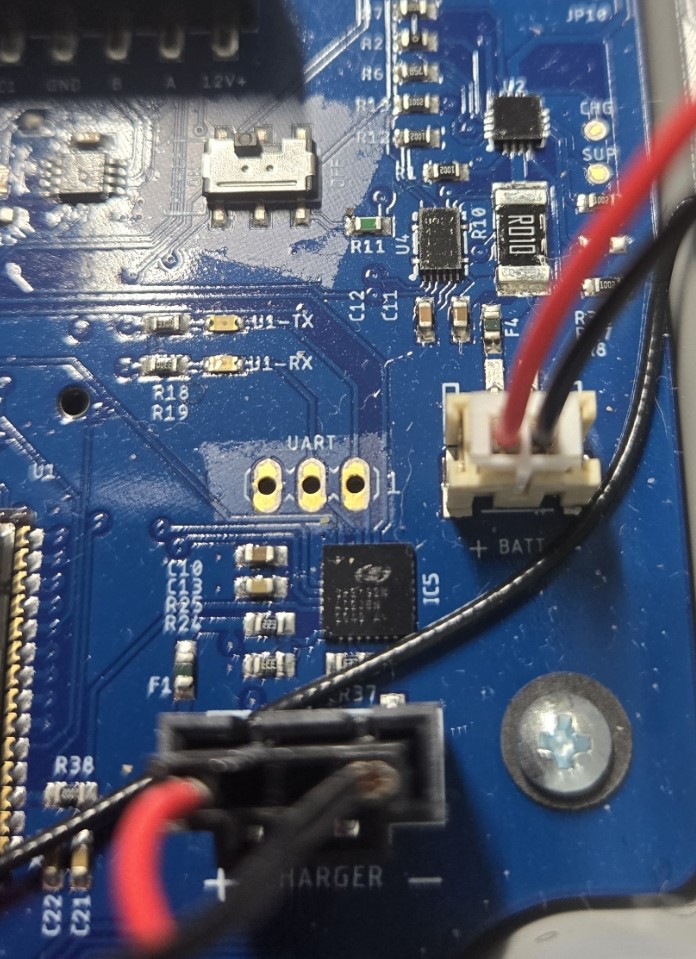 |
Make sure the battery has the correct polarity before connecting if supplying third-party batteries |
Get Prompt
First, you will need to open a serial terminal to the AMN and arrive at the NeatMon Main Menu. Be sure to disconnect any solar panel or external charger before connecting with USB.
If you are unsure how to get a prompt check the Opening Serial Terminal guide.
Press 'C' to stop booting and configure.......

NeatMon Main Menu
        1: Network config
        2: Sensor config
        3: Utilities
        x: < Save & Quit
>
¶ Set Sleep Mode
NeatMon Main Menu
        1: Network config
        2: Sensor config
        3: Utilities
        x: < Save & Quit
>3
After getting a prompt, select Utilities Menu.
Utility Menu
        1: Dump config
        2: Save config
        3: Recover config
        4: Reset to default configuration or format drive
        5: Enable Demo mode
        6: Unit test
        7: Interface with port
        8: Configure sleep and power settings
        9: Configure unit type
        x: <Back

>8
Select Configure sleep and power settings.
Configure power settings:
        1: Set sleep mode (3)
        2: Set power state (0)
        x: <Back

>1
Select Set sleep mode.
NOTE: Power state should not be modified from power state (0) (Constant Power Disabled).
WARNING: Deep sleep (3) disables sensor sampling
        period and uses sync period for all sampling

Configure: Sleep Settings
        0: Disable sleep
        1: Light sleep
        3: Deep sleep
        x: <Back

>Select desired sleep mode.
NOTE: Disable sleep is not recommended. Light Sleep is recommended if sensor sample rate and node sync rate are different. For example for 5 minute sampling of the LeafMon sensor and 30 minute sync rate, use Light Sleep. Deep Sleep is recommended for power savings, but will set the sensor sample rate to match the node sync rate. For example for 15 minute sampling of the LeafMon sensor and 15 minute sync rate, use Deep Sleep.
Utility Menu
        1: Dump config
        2: Save config
        3: Recover config
        4: Reset to default configuration or format drive
        5: Enable Demo mode
        6: Unit test
        7: Interface with port
        8: Configure sleep and power settings
        9: Configure unit type
        x: <Back

>xEnter x to exit the utility menu.
neatMon Main Menu
        1: Network Config
        2: Sensor Config
        3: Utilities
        x: < Save & Quit

>xEnter x to select <Save & Quit to save the changes and reboot the node.
NOTE: If you don't Save & Quit the configuration will not be saved.
¶ Network and Sync Rate Configuration
To change Network Configuration settings please refer to the Network Menu Reference page here.
¶ Add Sensor
NeatMon Main Menu
        1: Network config
        2: Sensor config
        3: Utilities
        x: < Save & Quit

>2From the neatMon Main Menu, select Sensor Config
Sensor Config
        1: Add sensor
        2: Disable Battery monitor
        3: List sensors
        4: Delete sensor
        5: Test read
        x: <Back

>1Choose Add sensor
Create sensor

Select type:
        1: nM TPRH sensor                       9: nM+ A1/A2 analog (5v max)
        2: nM NCTP sensor
        3: nM GPIO analog (4v max)
        4: nM digital counter
        5: nM air quality monitor
        6: Generic SDI-12 Sensor (M)
        7: Sentek RS485 SM
        8: LeafMon sensor
        x: <Back

>8Choose LeafMon sensor
¶ Configure Sampling
Enter sample rate (mins):You can now define how often the sensor will read. If you are unsure, the recommended rate is 15 and should rarely be changed, if faster sampling is required please contact support for pricing details as it may affect subscription costs.
NOTE: Sensor sample rate will ignore the value entered above and default to network sync if node is in Deep Sleep mode (see above). If desired sensor sample rate is different from desired node sync rate, use Light Sleep mode (see above).
Type your desired sample rate and then press enter.
¶ Configure Ports
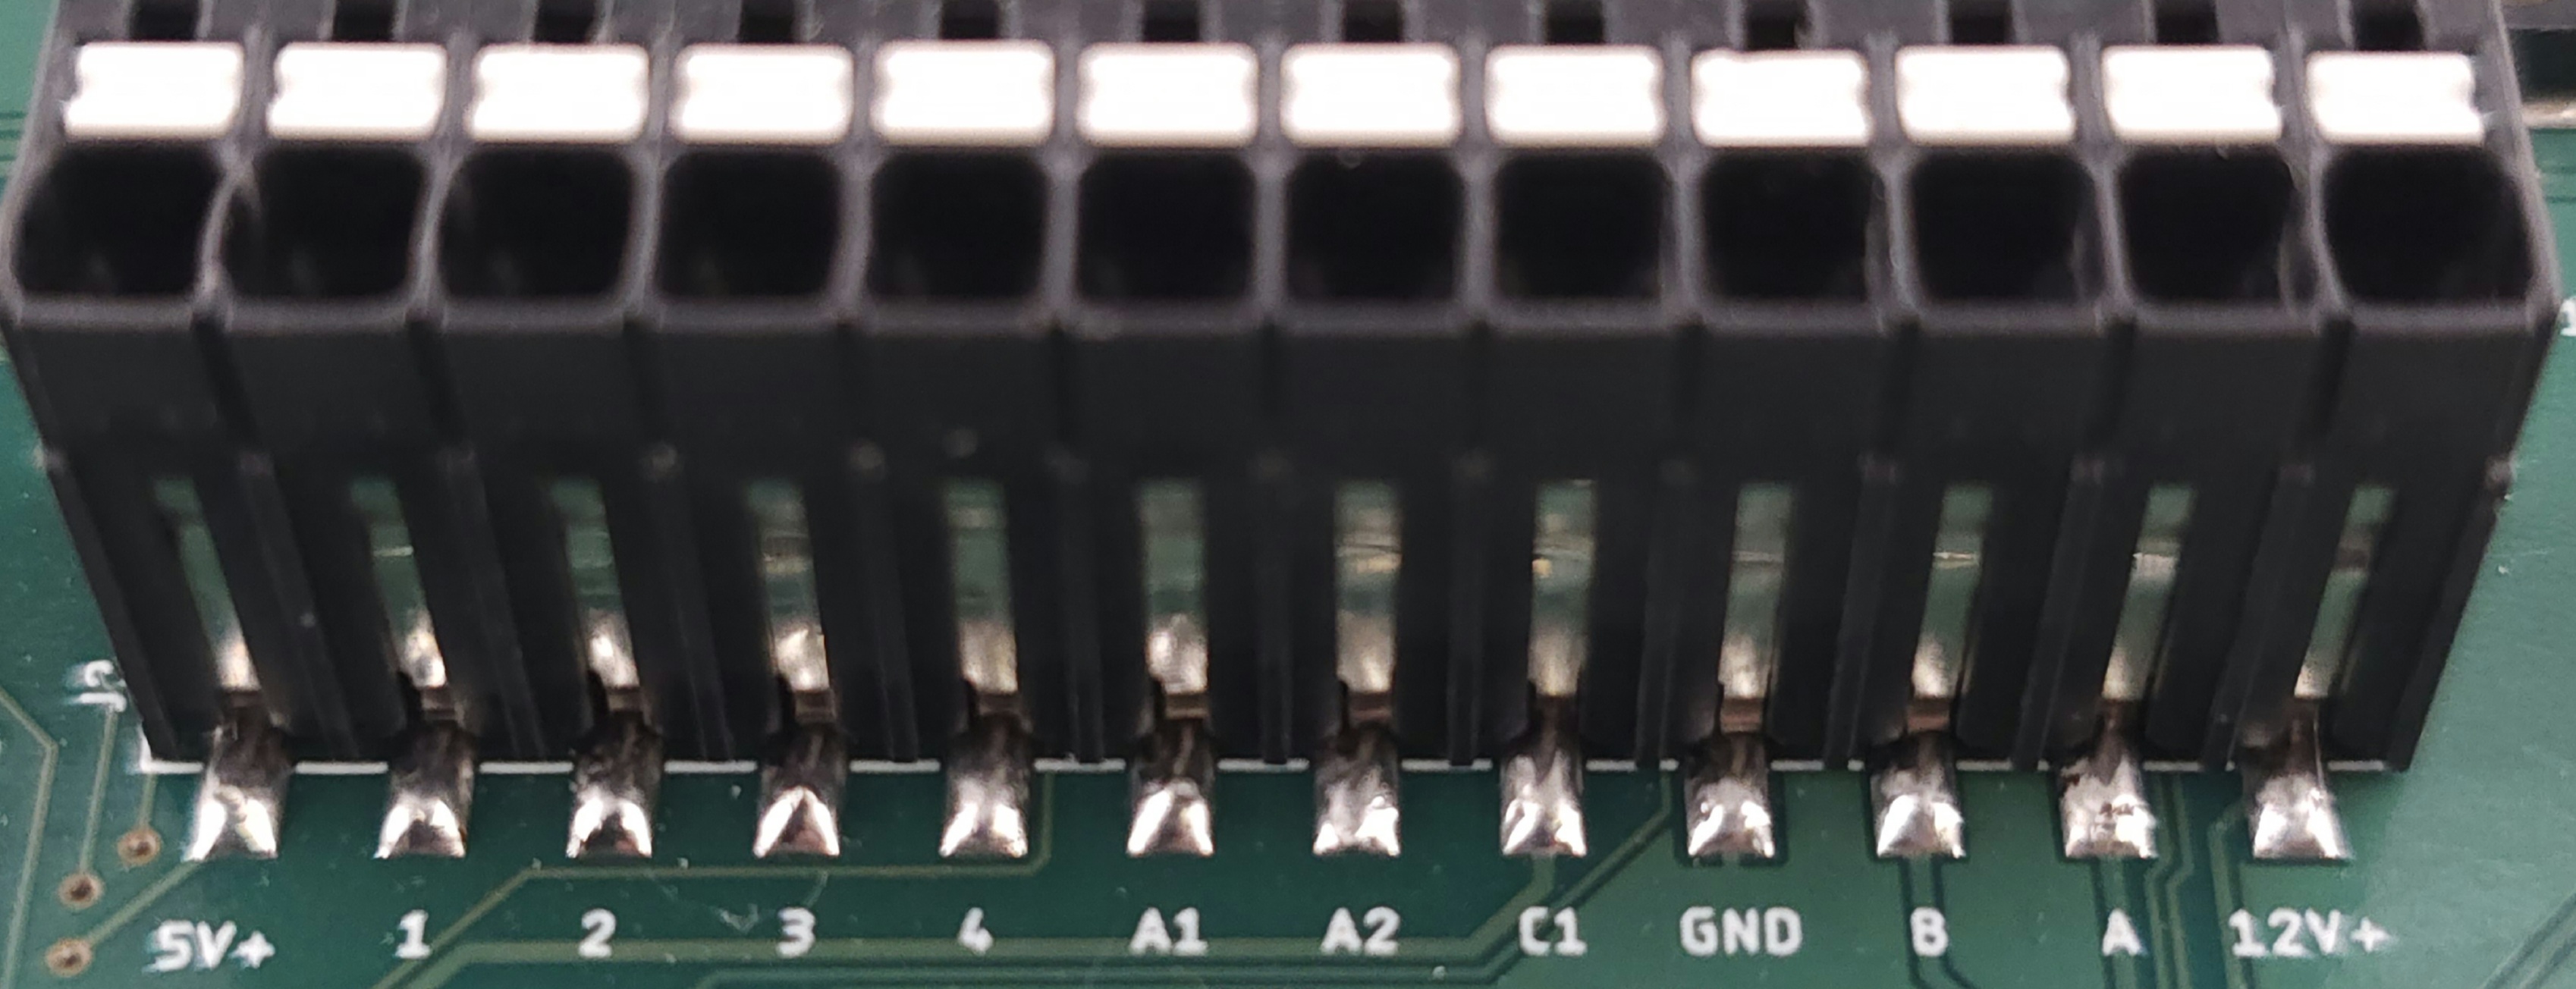
| 5v+ | GPIO 1 | GPIO 2 | GPIO 3 | GPIO 4 | Analog 1 | Analog 2 | Counter 1 | Ground | RS485 B | RS485 A | 12v+ |
The LeafMon-S uses SDI-12 and connects to any GPIO port. However, only one LeafMon sensor may be connected to each GPIO port, and no other sensors can be connected to the same port.
Enter GPIO port (1-4):
>We recommend using port 1 through 4 to connect, in the photos in this guide, the sensor is connected to GPIO 1
¶ Configure Sensor Name
The LeafMon-S sensor comes with a serial number. The last two digits of the serial number should be used to configure the sensor name. For example 10000ab, use ab
Sensor name format LMXXA-P
Enter new name XX (max 2 chars):
¶ Save Configuration
Created LMab0-1


Sensor Config
        1: Add sensor
        2: Disable Battery monitor
        3: List sensors
        4: Delete sensor
        5: Test read sensors
        x: <Back

>2
Exiting...Choose <Back by pressing x.
neatMon Main Menu
        1: Network config
        2: Sensor config
        3: Utilities
        x: < Save & Quit

>xChoose < Save & Quit by pressing x again to save changes and reboot the node.
NOTE: If you don't Save & Quit the sensor will not be saved.
¶ Sample Sensor
First, you must open a serial terminal to the AMN and arrive at the NeatMon Main Menu. If you're unsure how to do this check the Opening Serial Terminal guide.
NeatMon Main Menu
        1: Network config
        2: Sensor config
        3: Utilities
        x: < Save & Quit

>Choose Sensor config by pressing 2.
Sensor Config
        1: Add sensor
        2: Disable Battery monitor
        3: List sensors
        4: Delete sensor
        5: Test read
        x: <Back

>Choose Test read by pressing 5.
ID      |       Sensor name
---------------------------------
0       |       Battery monitor
---------------------------------
1       |       LMab0-1
        Type: LM [6]
        Sample rate (mins): 15
        Interface: SDI12
        Port: 1
        Misc:

Enter ID of sensor to read (x to cancel): 1Type the number related to the LeafMon sensor.
Power: 3V3_SW power enabled
Power: 12V/5V power enabled
LeafMon configured!
Reading from LMab0-1 [1]
LeafMon 0 will be ready in 3 seconds with 9 measurements!
Waiting 3 seconds for response...

[0D0!]: 0+025.23+024.09+024.65+026.11+023.91
[0D1!]: 0+040.25+00030+00010+00.372
[25.23, 24.09, 24.65, 26.11, 23.91, 40.25, 30.00, 10.00, 0.37, -0.00]

Read again? Y/nIt will now read the sensor and output the sensor data. You can type ‘y’ and press enter to take another reading or "n" to exit
¶ Deployment
When deployed, the cable from the sensor should not be kinked or pinched, a gentle sweep is recommended.
It is recommended to add a loose service loop between the AMN and the LeafMon sensor in the event that the cable is incidentally pulled on.
After disconnecting from the node, ensure the POWER Switch on the node is set to ON, plug the solar panel back in and hit the reset button on the node. DO NOT Reset the node if the LED light on the modem is blinking (actively connected to cell tower) as it may corrupt the modem firmware.
Please see Cermetek website for further installation information.