Overview
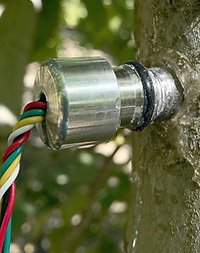
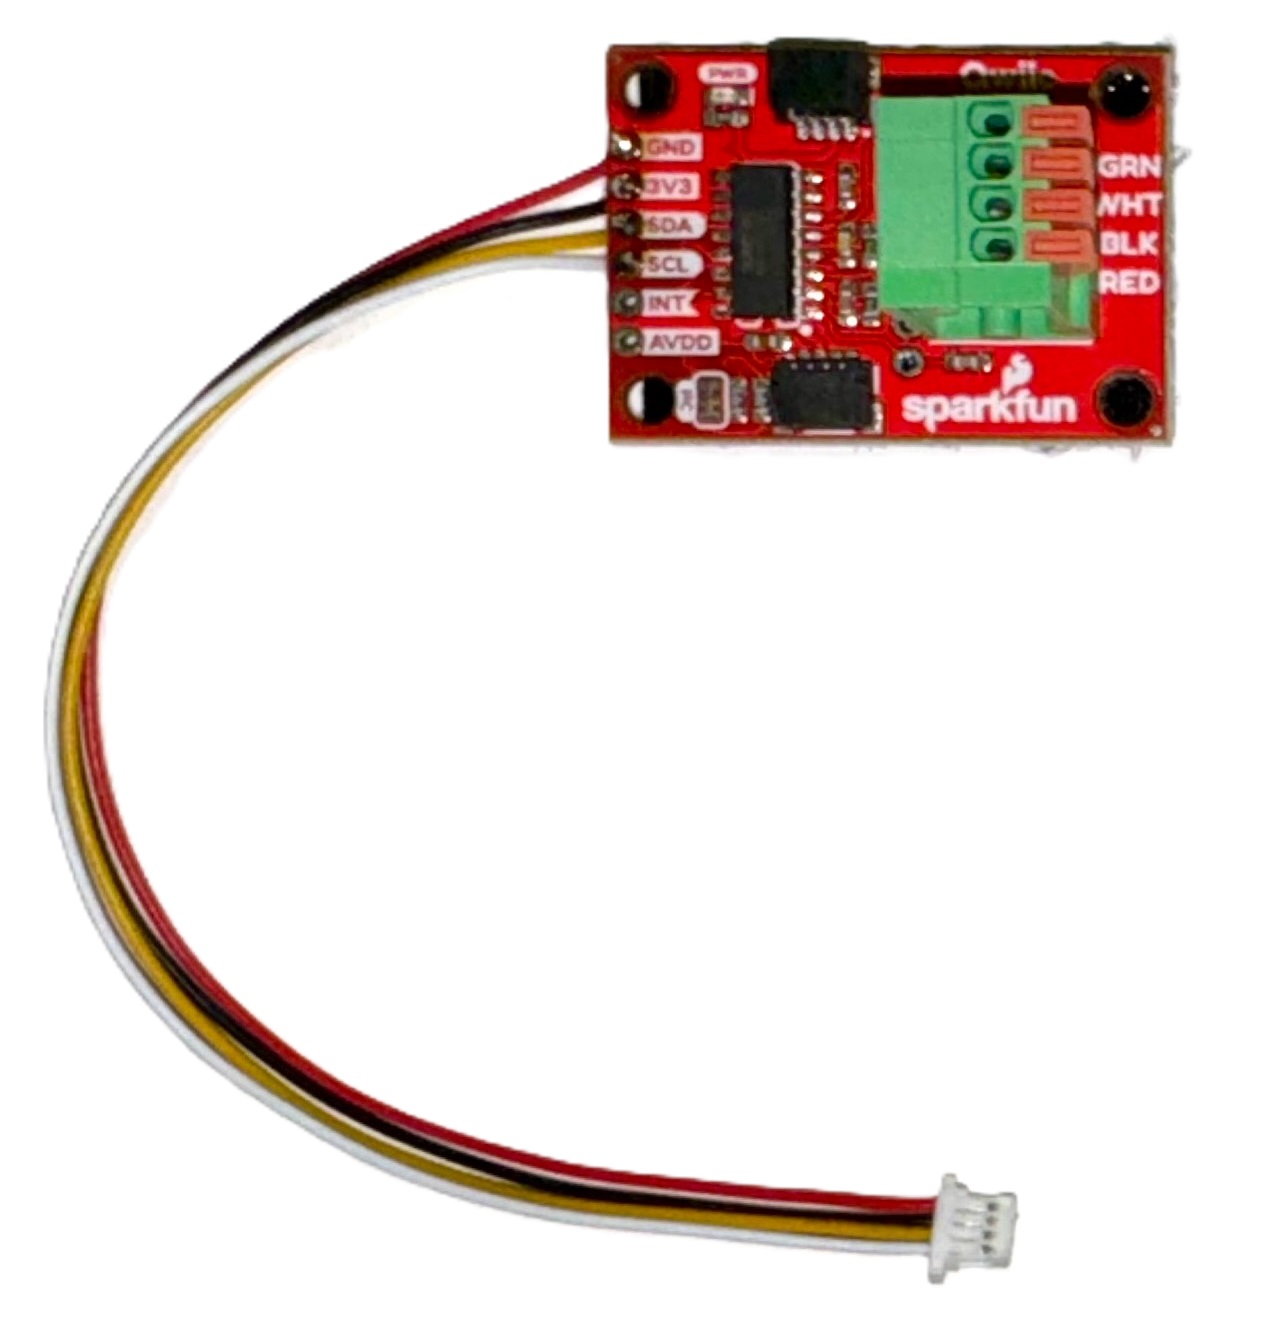
The FloraPulse sensor connects to the nM Automated Monitoring Node via the AMN-EXP-BRIDGEADC-PCB-QWIIC to the I2C QWIIC Port to provide mV readings of the FloraPulse sensor. For additional information on the FloraPulse sensor, visit the FloraPulse resources page here.
¶ Getting Started
¶ Installation
The FloraPulse connects to the neatMon Automated Monitoring node QWIIC port via the AMN-BRIDGEADC-PCB-QWIIC board. For instructions on utilizing the FloraPulse SDI-12 converter box, please refer to the Generic SDI-12 Sensor instructions or contact neatMon.


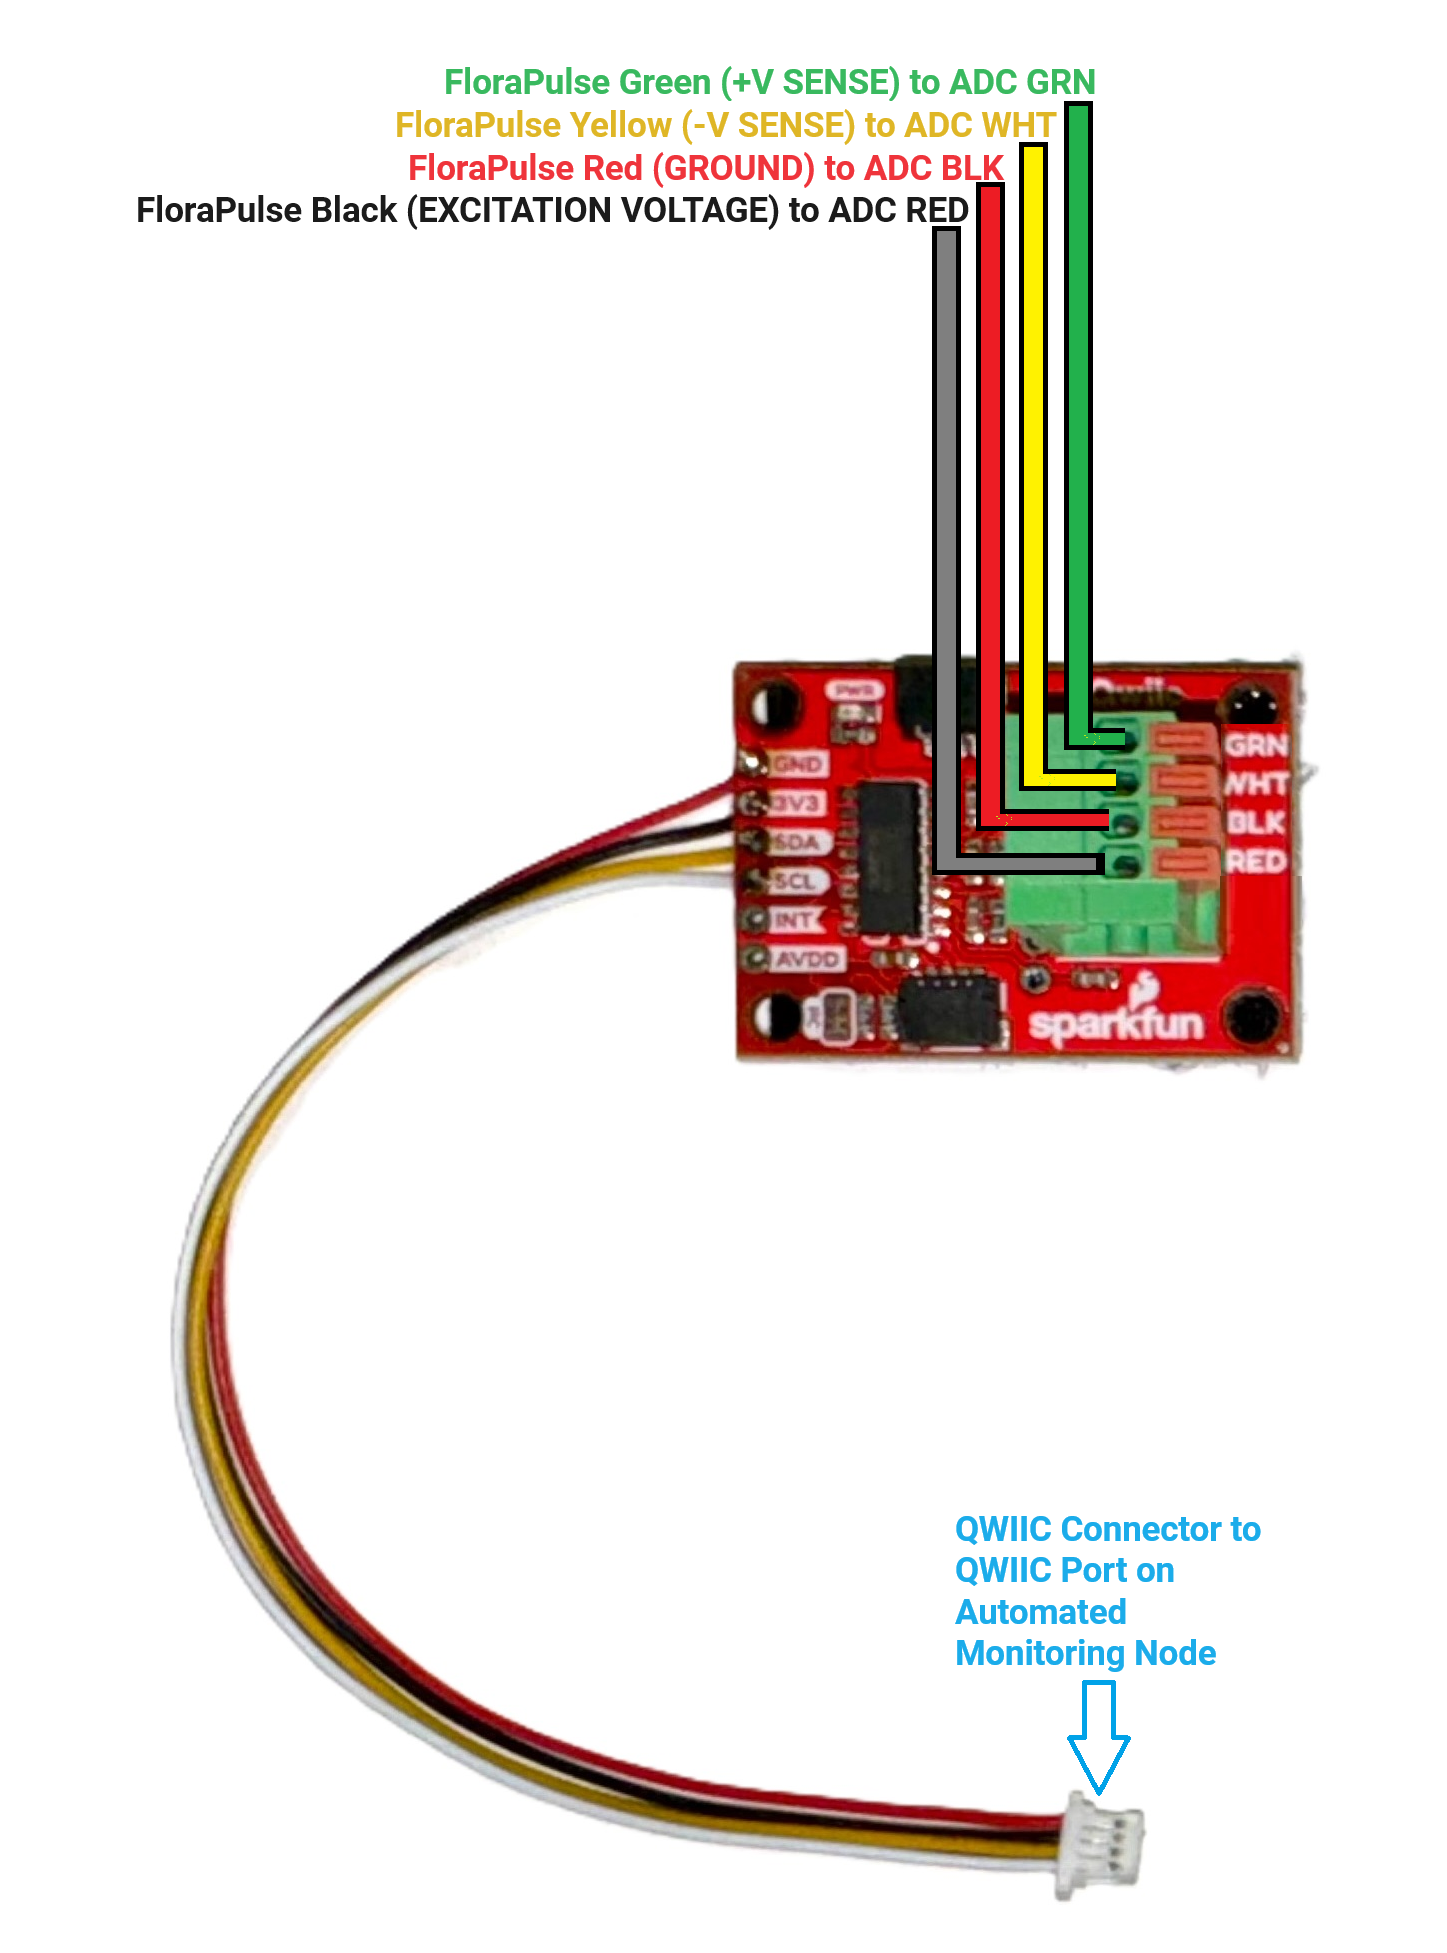
FloraPulse Green Wire (+V SENSE) to “GRN” port on ADC
FloraPulse Yellow Wire (-V SENSE) to "WHT" port on ADC
FloraPulse Red Wire (GROUND) to "BLK" port on ADC
FloraPulse Black Wire (EXCITATION VOLTAGE) to “RED” port on ADC
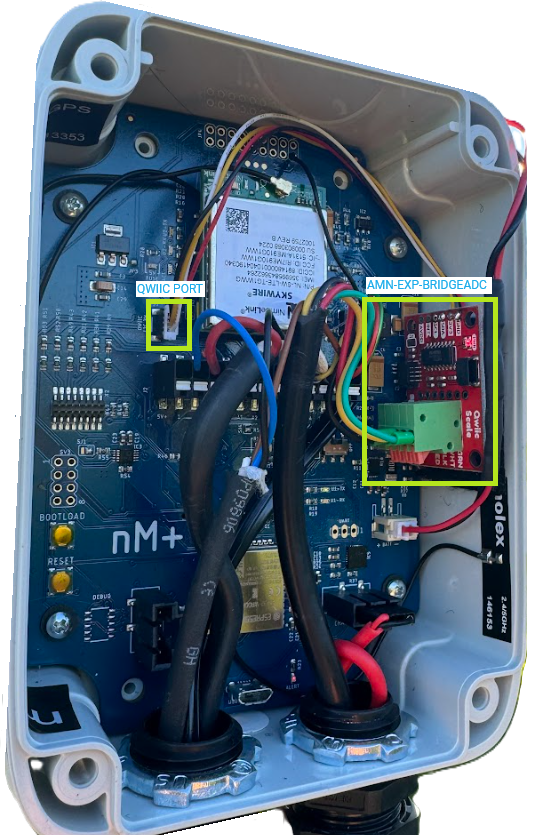
¶ Configuration
¶ Get Prompt
First, you will need to open a serial terminal to the AMN and arrive at the NeatMon Main Menu. Be sure to disconnect any solar panel or external charger before connecting with USB.
If you are unsure how to do this check the Opening Serial Terminal guide.
Press 'C' to stop booting and configure...........

neatMon Main Menu
        1: Network Config
        2: Sensor Config
        3: Utilities
        x: < Save & Quit
<2 Choose Sensor Config.
¶ Select Sensor
Sensor Config
        1: Add sensor
        2: Disable Battery monitor
        3: List sensors
        4: Delete sensor
        5: Test read
        x: <Back
<1 Choose Add sensor.
Create sensor

Select type:
        1: nM TPRH sensor
        2: nM NCTP sensor
        3: nM GPIO analog (4v max)
        4: nM digital counter
        5: nM air quality monitor
        6: Generic SDI-12 Sensor
        7: Sentek RS485 SM
        8: LeafMon sensor
        9: Next page....

        x: <Back
<9 Choose Next page… .
Sensor list continued...

Select type:
        1: nM+ A1/A2 analog (5v max)
        2: Relay Controller - 8 Relay
        3: Relay Controller - RS485
        4: Davis VP2 Weather Station - RS485
        5: High frequency kHz counter
        6: GPIO Pulse counter
        7: Modbus Sensor
        8: HD GPS (ZED-F9P)
        9: Next page....

        x: <Back to Sensor Menu
<9 Choose Next Page… .
Sensor list continued...

Select type:
        1: EXP-ADC-16P
        2: Bridge/24-bit ADC
        3: nM+ Relay-DCL-3
        4: nM+ THCO2 sensor

        x: <Back to Sensor Menu
<2 Choose Bridge/24-bit ADC.
¶ Configure Sensor
Select type:
        1: EXP-ADC-16P
        2: Bridge/24-bit ADC
        3: nM+ Relay-DCL-3
        4: nM+ THCO2 sensor

        x: <Back to Sensor Menu

>2
Enter sample rate (mins): >15You can now define how often the sensor will read. If you are unsure, the default is 15 minutes and should rarely be changed. Type your desired sample rate and then press enter.
The Clock and Data port is needed for the next two steps. When connecting via the QWIIC port as shown above, the Clock and Data ports are both set to 0.
Enter i2c Clock port (0-4: 0=SCL, 1=GPIO1, 2=GPIO2...): >0Enter 0 to set Clock port to 0.
Enter i2c Data port (0-4: 0=SDA, 1=GPIO1, 2=GPIO2...): >0Enter 0 to set Data port to 0.
Use scaling (M(X) + B)? (Y/n) >nIt is recommended to enter scaling in the nM Hub. Raw sensor data is helpful for troubleshooting. Enter n to skip this step.
Change sensor name (adc2)? (Y/n) >Y
Enter new name (max 3 chars): fp
Set name

Created fpUser may change sensor name if desired. A two character name (such as fp) allows for adding additional FloraPulse sensors to the node with unique names. E.g. fp1, fp2, fp3.
¶ Save Configuration
Created fp

Sensor Config
        1: Add sensor
        2: Disable Battery monitor
        3: List sensors
        4: Delete sensor
        5: Test read sensors
        x: <Back

>x
Exiting...Choose <Back by pressing x.
NOTE: You may add additional sensors at this step by pressing 1 prior to exiting if desired.
Exiting...

neatMon Main Menu
        1: Network Config
        2: Sensor Config
        3: Utilities
        x: < Save & Quit

>x
Quitting...

Memory: Configuration Saved! (Used 1045/4040 bytes)
Resetting node now..Chose < Save & Quit by pressing x.
NOTE: If you don't do this the sensor will not be saved.
--------------------------------------

        Automated Monitoring Node
        by neatMon, Inc.

--------------------------------------

Device Info:
        GUID:           bbda272d-6fb1-358f-d48afcae6794
        P/N:            PLUS
        HW:             1.06
        FW:             2.49
        Modem:          ME910G1

Network Settings:
        Server:         api.neatmon.io
        Path:           /api/device/bbda272d-6fb1-358f-d48afcae6794
        Port:           1330
        Modem FW:       1
        APN network:    vzwinternet
        APN username:
        APN password:
        Reg Type:       LTE
        Sync rate:      15m
        Alert sync rate:15m
        Modem debug:    enabled

General Settings:
        Battery monitor:enabled
        Demo mode:      false
        Num sensors:    1
        Sleep mode:     3
        Power mode:     0

Sensor Definitions/Settings
ID      |       Sensor name
---------------------------------
1       |       fp
        Type: adc [17]
        Sample rate (mins): 15
        Interface: I2C [SCL: SCL, SDA: SDA]
        Port: 0
        Misc:
                Read ms: 100
                M: 1.00
                B: 0.00

Press 'C' to stop booting and configure............The node will now reboot and display the sensor(s) configured. Press c to make additional changes. To allow the node initialize into normal operation, do not press anything.
NOTE: ALL Sleep mode and Power mode settings are compatible with this sensor. Sleep mode 3 and Power mode 0 are recommended to reduce power consumption. Other sensors on the node may require different Sleep and Power settings. For Sleep and Power settings of other sensors, refer to sensor guides or contact neatMon for assistance.
¶ Sample Sensor
¶ Get Prompt
First, you will need to open a serial terminal to the AMN and arrive at the NeatMon Main Menu, or continue on from previous steps. If you are unsure how to do this check the Opening Serial Terminal guide.
Press 'C' to stop booting and configure...........

neatMon Main Menu
        1: Network Config
        2: Sensor Config
        3: Utilities
        x: < Save & Quit
<2 Choose Sensor Config.
Sensor Config
		1: Add sensor
		2: Disable Battery monitor
		3: List sensors
		4: Delete sensor
		5: Test read sensors
		x: <Back


>5Choose Test read sensors.
ID	|	Sensor name
---------------------------------
0	|	Battery monitor
---------------------------------
1	|	fp
	Type: adc [17]
	Sample rate (mins): 15
	Interface: I2C [SCL: SCL, SDA: SDA]
	Port: 0
	Misc:

	Read ms: 100
	M: 1.00
	B: 0.00
Enter ID of sensor to read (x to cancel): 1
Enter the number of the sensor that should be read. In this example, FloraPulse (fp) is 1.
Power: 3V3_SW power enabled
Power: 12V/5V power enabled
Preparing to read Bridge ADC
Power: 12V/5V power enabled
Power: 3V3_SW power enabled
I2C Config: [0] SDA(23), SCL(22), State (1)

nM flr [0] connected!
Preparing to read Bridge ADC
Power: 12V/5V power enabled
Power: 3V3_SW power enabled
I2C Config: [0] SDA(23), SCL(22), State (1)

nM flr [0] connected!
Reading from nM fp [0]
Preparing to read Bridge ADC
Power: 12V/5V power enabled
Power: 3V3_SW power enabled
I2C Config: [0] SDA(23), SCL(22), State (1)

Waiting 100ms...
Scaled Reading: 80716.000000
Read again? Y/nIt will now read the sensor and output the sensor data. Enter Y to read again, or n to exit.
¶ Calibration
¶ Formula
Each FloraPulse sensor has unique Offset and Multiplier values provided by FloraPulse that must be used to calibrate the sensor data. Please contact FloraPulse with the sensor serial # if you need these values.
The calibration formula is:<offset>+<multiplier>*((2.4/(16777216/(x))/.001)/2.4)
Example formula:10.847+-3.9846*((2.4/(16777216/(x))/.001)/2.4)
Where FloraPulse provided calibration is the following:10.847 = offset-3.9846 = multiplier
nM Hub Calibration
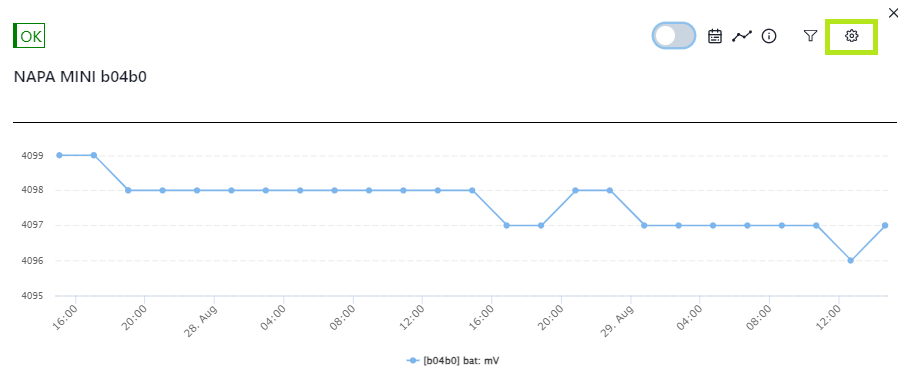
Navigate to the graph view of the device being configured in the nM Hub via the Map page or Devices page. Click on the device to bring up the graph view, and select the gear icon to open the Options page.
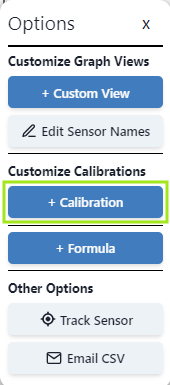
On the options page, click + Calibration.
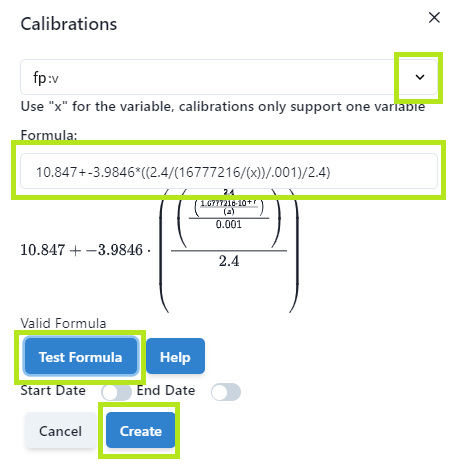
On the Calibrations page, select the sensor from the dropdown list, enter the formula with the Multiplier and Offset values provided by FloraPulse, click Test Formula to validate the formula, and click Create to apply the calibration.
¶ Deployment
When deployed, the cable from the sensor should not be kinked or pinched, a gentle sweep is recommended.
It is recommended to add a loose service loop between the AMN and the FloraPulse sensor in the event that the cable is incidentally pulled on.
Please see FloraPulse website for further installation and sensor information.